Creating an Action
In this section we'll create an Action from scratch.
As I stated on the first page, an Action is a recorded set of instructions. Before we start recording the instructions, we need to start a new Action.
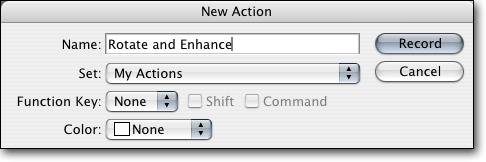
Figure 2.1
Step 1: Press the “Create new action” button in the Actions panel. It’s the second button from the right – next to the trash button.
Step 2: You should be prompted to name the new action. See figure 2.1 for an example. I’ve named my Action “Rotate and Enhance.” I’ve tried to be descriptive so when I’m looking for the Action in the future I’m able to pick it out of a list easily.
Step 3: Type in the name of your action in the “Name:” field, then make sure that the correct Action set is selected. This is the name of the folder you made in Task 1.
Step 4: Once you’ve made sure that the “Name:” and “Set:” fields are correct, press the record button.
From this moment on, every action you take with the software is being recorded. On the next page we’ll start making changes to the opened file.